
Which harness do you have?
The harness you have decides how it goes on, so it is worth a quick look before you start. Once you look past the colours and the branding, most dog harnesses fall into one of two groups.
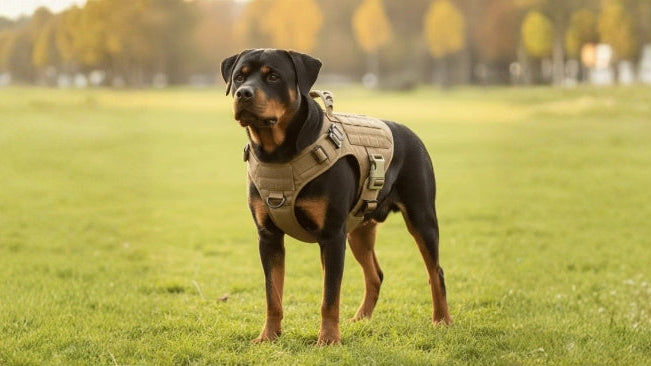
An over-the-head harness has a neck opening you lift over your dog's head, with a strap that buckles behind the front legs. A step-in harness lies flat on the floor and your dog puts their front feet into it, with the buckles closing on the back.
There is one more thing to spot: where the lead attaches. A ring between the shoulder blades means a back-clip harness. A ring in the middle of the chest means a front-clip or no-pull design, which changes nothing about how you put it on, only where the lead ends up.
How to put on a dog harness step by step
These seven steps cover the over-the-head harness, which is the style most people have at home. Work through them in order the first time. After that, most of it becomes muscle memory and you will only be doing steps three to five.
Step 1: Work out which way round the harness goes
Hold the harness up and find the D-ring, because that ring tells you straight away which side faces up. On a back-clip harness it sits between the shoulder blades, on a front-clip harness it sits in the centre of the chest.
The narrower of the two openings is the neck. If your harness carries a label, that is usually another reliable clue about which way it is meant to sit.
Step 2: Loosen all the straps
Open the straps wider than you think you need. A harness that arrives snug from the packaging, or one you tightened right down when your dog was smaller, will not slide over the head easily.
Forcing it is exactly the moment your dog decides this is not for them, so slide every adjuster out before you go near them.
Step 3: Slip the harness over your dog's head
Bring the neck opening over your dog's head with the D-ring landing between the shoulder blades. Kneel beside your dog rather than leaning over them from the front, which most dogs find far less imposing, and ask them to stand if they are sitting. The straps should now hang loose around the chest, ready for the legs.
Step 4: Bring the front legs through
Guide one front leg at a time through the opening between the neck strap and the belly strap. Lift the paw gently at the elbow rather than pulling on the leg itself. If a leg will not go through easily, the harness is probably twisted or turned around, so check before you push.
Step 5: Clip the buckles under the belly
Reach under your dog's belly, bring the buckle ends together and click them shut until you hear them lock. On a harness with two buckles, close both, because a single closed side leaves an opening your dog can back straight out of.
If the buckle will not reach, the strap is still too tight, so loosen it rather than pulling harder.
Step 6: Adjust until two fingers fit
Two fingers is the standard to work to: you should be able to slide two fingers flat underneath any strap, with light resistance. Tighten each strap a little at a time and alternate sides, so the harness stays centred on your dog's body.
Keep the chest strap below the throat and clear of the shoulder joint, so the front legs can still swing normally when your dog walks.
Step 7: Attach the lead and check before you go
Clip the lead to the D-ring rather than to a small ID tag ring, if your harness has one, because that smaller ring is not built to take the pull of a lead. Then do the back-out test: hold the lead and encourage your dog to take a couple of steps backwards.
If the harness slides forward towards their head it needs another notch tighter. If it stays put, you are ready.
Putting on a step-in harness
A step-in harness follows a different order, and it is the easier option for dogs who dislike anything coming over their head. Lay it flat on the floor with the buckles facing up and you will see two triangles where the legs go. Stand behind your dog and place one front paw into each triangle.
Lift both ends up along the sides of the body and clip them together on the back. From there the checks are the same: two fingers under every strap, nothing pressing on the throat, and a quick back-out test before you head out.
If your dog wriggles away from the harness
A dog who backs off when the harness comes out is usually telling you something about timing rather than about the gear itself. Trying to fit it in the thirty seconds before a walk, when they are already excited, rarely goes well. Practise at a quiet moment instead, with the lead nowhere in sight.
Start by holding the harness out and letting your dog sniff it, then reward that. Next time, rest it over their neck for a second and reward again. Build up to buckling it, and then to wearing it around the house for a few minutes.
For puppies and small dogs, crouch down to their level and support the chest with one hand, because a small frame gets pushed off balance easily. If your dog flinches at one particular spot every time, look at that spot rather than pushing on.
Rubbing behind the elbows or along the neck edge is common with a harness that sits slightly off. If the skin there looks red or sore, leave the harness off and speak to your vet.
Looking for a lead to go with it?
A harness only does half the job, and the lead you clip to it changes how the walk feels for both of you. A shorter lead keeps your dog close on a busy pavement, while a longer one gives them room to sniff and wander on open ground.
Have a look at the dog leads at Duke & Scoop when you are ready to pair the two up.